That last post was just reposted!
In the apiman blog: http://www.apiman.io/blog/policies/2015/08/17/limiting-policies.html
And, in Dzone: https://dzone.com/articles/rate-based-policies-and-quotas-in-jboss-apiman-1
Thursday, August 20, 2015
Monday, August 17, 2015
Rate Based Policies and Quotas in JBoss apiman

In this, the sixth article in the series on apiman, JBoss’ new API Management framework, we’ll examine how apiman enables you to govern access to managed services through the use of rate limiting policies.
The runtime core of apiman is the API Gateway and the policies that it applies to incoming requests to services. apiman is configured out of the box with a variety of policies that can be used to govern access to services managed by the API Gateway based on IP address, user authentication, and usage levels. From its first release, apiman has supported rate limiting policies, where the upper limit for use of a service could be governed by a policy. In its new 1.1.6 release, apiman has expanded this support to include quota based limiting policies.
Types of Limiting Policies
As of release 1.1.6, apiman supports these types of limiting policies:
- Rate Limiting - This policy type governs the number of times requests are made to a service within a specified time period. The requests can be filtered by user, application, or service and can set the level of granularity for the time period to second, minute, hour, day, month, or year. The intended use of this policy type is for fine grained processing (e.g., 10 requests per second).
- Quota - This policy type performs the same basic functionality as the Rate Limiting policy type., however, the intended use of this policy type is for less fine grained processing (e.g., 10,000 requests per month).
- Transfer Quota - In contrast to the other policy types, Transfer Quota tracks the number of bytes transferred (either uploaded or downloaded) rather than the total number of requests made.
Each of these policies, if used singly, can be effective in throttling requests. apiman, however, adds an additional layer of flexibility to your use of these policy types by enabling you to use them in combinations. Let's look at a few examples.
Combinations of Limiting Policies = Flexibility
Limiting the total number of service requests within a period of time, is a straightforward task as this can be configured in a quota policy. This policy, however, may not have the desired effect as the quota may be reached early in the defined time period. If this happens, the requests made to the service during the remainder of the time period will be blocked by the policy. A better way to deal with a situation like this is to implement a more flexible approach where the monthly quota policy is combined with a fine grained rate limiting policy that will act as a throttle on the traffic.
To illustrate, there are about 2.5 million seconds in a month. If we want to set the service request quota for a month to .5 million, then we can also set a rate limit policy to a limit of 5 requests per second to ensure that service requests are throttled and the service can be accessed throughout the entire month.
Here’s a visual view of a rate limiting policy based on a time period of one week. If we define a weekly quota, there is no guarantee that users will not consume that quota before the week is over. This will result in a service requests being denied at the end of the week:


The ability to throttle service requests based on service request counts and bytes transferred provides even greater flexibility in implementing policies. Services that transfer larger amounts of data, but rely on fewer service requests can have that data transfer throttled on a per byte basis. For example, a service that is data intensive, will return a large amount of data in response to each service request. The service may only receive a request a few hundreds of times a day, but each request may result in several megabytes of data being transferred. Let's say that we want to limit the amount of data transferred to 6GB per hour. For this type of service, we could set a rate limiting policy to allow for one request per minute, and then augment that policy with a transfer quota policy of 100Mb per hour.
Summary
When you configure limiting policies with apiman, it's important to remember that the limits you set can not only function as hard limits for service requests, they can also be used to throttle service request. This throttling gives you the flexibility to control the level of incoming service requests over a period of time that you designate in the policies without blocking all incoming service requests. The flexibility that apiman provides you in configuring limiting policies is further enhanced by its support for you to create combinations of limiting policies. These combined policies work together to give you both coarse grained and fine grained control over incoming service requests.
Author Acknowledgements
As always, the author would like to acknowledge Eric Wittmann and the apiman team for their review comments and suggestions on writing this article!
Saturday, August 1, 2015
apiman Policy and Endpoint Security

In this, the fifth article in the series on apiman, JBoss’ new API Management framework, we’ll examine how apiman enables you to provide security for your managed services at the policy level, and and at the endpoint level for its managed and unmanaged endpoints.
Unintentionally Insecure?
If you read the first article in this series closely (https://dzone.com/articles/impatient-new-users) you might have noticed that in the course of creating a service whose endpoint was managed by the apiman API Gateway, we also inadvertently left that service in a very insecure state as unauthorized client applications could bypass the gateway and access the service directly. We discussed how to configure authentication in a policy for the managed service endpoint in the most recent post in this series (https://dzone.com/articles/adding-basic-authentication). This authentication policy provides username/password security for clients as they access the managed service through the API Gateway, but it does not protect the service from unauthorized access attempts that bypass the Gateway completely. To make the service secure from unauthorized client applications, endpoint level security should also be configured.
In this article, we’ll examine both apiman policy level and endpoint level security, how they compare, and how they differ.
Complementary Types of Security Provided by apiman
The best way to start our discussion of the different, but complementary types of security that we’ll examine in this article is with a diagram. The nodes involved are the client applications that will access our services, the apiman API Gateway, and the servers that host our services:


Policy Level Security
apiman includes several pre-defined policies OOTB. The policies provide support for controlling access to services based on the rate at which the services are invoked, the IP address of the client applications that access the services, authorization, and authentication. In the most recent article in this series, we showed how to configure an authentication policy. To keep things simple, we chose BASIC authentication. This BASIC Authentication policy provides security for the communication channel between the client applications and the apiman API Gateway. An incoming request to the API Gateway from a client initiates the policy chain, the policy is applied and the client is requested to supply a username and password. The level of security provided by this policy can be enhanced if the policy is configured with SSL encryption.
But, this policy level security only secures the left side of the diagram, that is the communication channel between the applications and the API Gateway. In this communication channel, the applications play the role of the client, and the API Gateway plays the role of the server.
We also want to secure the right side of the diagram, where the API Gateway plays the role of a client, and the services play the role of the servers.
(It’s also worth noting that while policy security protects the managed service, it does nothing to protect the unmanaged service as this service can be reached directly, without going through the API Gateway. This is illustrated by the red line in the diagram. So, while access to the managed service through the apiman API Gateway is secure, policy security does not secure the unmanaged service endpoint.)
Endpoint Level Security
In contrast to policy level security, with endpoint security we are securing the right side of the diagram.
A recent post by Marc Savy to the apiman blog (http://www.apiman.io/blog/gateway/security/mutual-auth/ssl/mtls/2015/06/16/mtls-mutual-auth.html) described how to configure Mutually Authenticated TLS (Transport Layer Security) between the API Gateway and the managed services. With Mutual TLS, bi-direction authentication is configured so that the identities of both the client and server are verified before a connection can be made.
In setting up Mutual TLS, keystores, containing a node’s private key, and truststores, containing public certificates to govern the other nodes that the node should trust, were created. The API Gateway was configured in its apiman.properties file to reference the keystores and truststores. The service was configured with mutual authentication by setting the API Security dropdown in the Implementation tab to MTLS/Two-Way-SSL. Finally, the service was programmed with mutual authentication enabled. With Mutual TLS configured, the communication channel on the right side of the diagram, from the API Gateway to the services, was made secure.
We should also note that, unlike policy security, endpoint security also secures the services from attempts to bypass the API Gateway. With Mutual TLS, a two-way trust pattern is created. The API Gateway trusts the services and the services trust the API Gateway. The services, however, do not trust the client applications. As is shown by the large “X” character that indicates that an application cannot bypass the API Gateway and access the services directly.
One last point that is important to remember is that the endpoint level of security applies to all requests made to the services, regardless of whatever policies are configured.
Compare and Contrast
To summarize, the differences between policy level security and endpoint level security are:
Policy Level Security
|
End Point Level Security
|
Secures communications between the applications (clients) and API Gateway (server)
|
Secures communications between the API Gateway (client) and services (servers)
|
Configured in an API Gateway policy
|
Configured for the API Gateway as a whole in apiman.properties and with key/certificates infrastructure
|
Applied by the policy at runtime
|
Applied for all service requests, regardless of the policies configured for a service
|
Does not secure the unmanaged service from access by unauthorized clients
|
Secures the unmanaged service endpoints from access by unauthorized clients
|
Author Acknowledgements
As always, the author would like to acknowledge Marc Savy, Eric Wittmann, and the apiman team for their review comments and suggestions on writing this article!
References
Monday, June 15, 2015
Thursday, June 11, 2015
Reposted to the apiman blog!
And that was fast - the latest post is up on the apiman blog:
http://www.apiman.io/blog/authentication/policy/2015/06/11/basic-auth.html
http://www.apiman.io/blog/authentication/policy/2015/06/11/basic-auth.html
Wednesday, June 10, 2015
Adding a BASIC Authentication Policy to a Managed Service in JBoss apiman

In this, the fourth article in the series on apiman, JBoss’ new API Management framework, we’ll examine how apiman enables you to not just manage services, but implement a layer of security to the services by adding an authentication requirement when clients access a managed service.
Securing Client Access to your Managed Services
As we’ve seen in the previous articles in this series, apiman enables you to govern the usage of the services that it manages by defining policies in the Managament UI that are then applied at runtime by the API Gateway. The apiman API Gateway applies the policy rules that you define to requests that it proxies to the managed service:
The OOTB policies that are packaged with apiman enable you to apply a variety of types of controls, including rate limiting (where access to a service is assigned a usage threshold) and black/whitelisting by IP address (where the client’s IP address governs their access to the service).
However, managing a service with apiman does not automatically make that service secure. Happily, however, apiman provides a policy that enables you to easily set up authentication to control access to your managed service. (Note that this policy governs the clients’ authenticated access to the managed service, and not establishing a secure connection where apiman authenticates the back-end services. In other words, in this article, we’re interested in adding authentication between the blue and pink boxes in the above diagram.)
Adding a BASIC Authentication Policy to a Managed Service
apiman is packaged with multiple pre-configured policies:
- Authorization - Access to services’ resources is controlled by user roles.
- BASIC Authentication - A username/password is required to access a service.
- Ignored Resources - Paths to services’ resources that will not be accessible. Requests to these service resource paths return a 404 (not found) error.
- IP Blacklist - Clients with specific IP address will be blocked from accessing a service.
- IP Whitelist - And, clients with specific IP address will not be blocked from accessing a service.
- Rate Limiting - Access to a service is limited by the number of requests in a defined time period. We demonstrated an example of a rate limiting policy in the first article in this series.
We’re interested in the BASIC Authentication Policy. Let’s take a closer look. The dialog to add a BASIC authentication policy to a service looks like this:

In creating the BASIC policy, we define an Authentication Realm (think of this as an area to be protected, within which usernames and passwords exist) and an optional HTTP header. The optional HTTP header is used to optionally pass the user's principal to the back-end service through an HTTP header. This is useful if the back-end system needs to know the username of the user calling it (e.g. to do user-specific operation). The “Transport security required” checkbox, if enabled, will cause the policy to fail if a client tries to connect to the service over http. The Policy will only accept credentials over https.
We’ll keep the Identity Source simple and select “Static Identities” and then define a user. Note that while this static approach is fine for testing purposes, you will want use one of the other Identity Source options (JBDS or LDAP) for a production environment as they can better handle a large number of users.

It’s important to remember that, in BASIC authentication, one of the factors that makes this, well, basic in nature, is that the username/password that you define are encoded (this is unencrypted base64 encoded text) when they are sent to the server. Since the text is not encrypted, it’s at risk of being copied and then used in an attack. For this reason, it’s safer to select the transport security option to configure SSL encryption.
To illustrate, here’s Java code that can encode and then decode the username:password string:
 Base64.Encoder encoder = Base64.getEncoder();
 String normalString = "user1" + ":" + "password1";
 String encodedString = encoder.encodeToString(normalString.getBytes(StandardCharsets.UTF_8));
 System.out.println ("The encoded string is: " + encodedString);

 Decoder decoder = Base64.getDecoder();
 byte[] unencodedStringArray = decoder.decode(encodedString);
 String unencodedString = new String (unencodedStringArray);
 System.out.println ("The unencoded string is: " + unencodedString);

 The encoded string is: dXNlcjE6cGFzc3dvcmQx
 The unencoded string is: user1:password1
So - unlike encrypted strings, your encoded username and password strings are not secure!
When a Request is made to the Service
It’s interesting to see step-by-step what happens when a request is made to the service and the BASIC authentication policy is applied. Let’s take a look at the request and the responses. I used the “HttpFox” http analyzer (https://addons.mozilla.org/en-us/firefox/addon/httpfox/) to “listen in” on the requests sent to the server and the responses sent back.
Here’s the first request made to the service, notice that a username/password is not included.
 (Request-Line) GET /apiman-gateway/serviceProducerOrg/echossl/1.0?apikey=6f8784cd-5754-47b0-9b8b-b2eb8c5b190f HTTP/1.1
 Host     localhost:8443
 User-Agent     Mozilla/5.0 (X11; Linux x86_64; rv:24.0) Gecko/20100101 Firefox/24.0
 Accept     text/html,application/xhtml+xml,application/xml;q=0.9,*/*;q=0.8
 Accept-Language     en-US,en;q=0.5
 Accept-Encoding     gzip, deflate
 Cookie     __utma=111872281.1348865079.1409020839.1411395889.1419258109.7; __utmz=111872281.1409020839.1.1.utmcsr=(direct)|utmccn=(direct)|utmcmd=(none); s_fid=72CCAD206D09146C-233B60F47DBEA290
 Connection     keep-alive
The response, as we expected, shows that the request has triggered an authentication failure. This is due to the authentication requirement that we defined and is being applied by the API Gateway. Note the 401 error code and the reference to BASIC authentication:
 (Status-Line)     HTTP/1.1 401 Unauthorized
 X-Powered-By     Undertow/1
 Server     WildFly/8
 X-Policy-Failure-Type     Authentication
 Date     Wed, 03 Jun 2015 13:43:26 GMT
 Connection     keep-alive
 WWW-Authenticate     BASIC realm="myRealm"
 X-Policy-Failure-Code     10004
 Content-Type     application/json
 Content-Length     165
 X-Policy-Failure-Message     BASIC authentication failed.
The browser then automatically pops up a dialog for us to enter the username and password:

A request is then sent that includes the username and password encoded into a string. In this request, the encoded (but not encrypted) username and password are included:
 (Request-Line)     GET /apiman-gateway/serviceProducerOrg/echossl/1.0?apikey=6f8784cd-5754-47b0-9b8b-b2eb8c5b190f HTTP/1.1
 Host     localhost:8443
 User-Agent     Mozilla/5.0 (X11; Linux x86_64; rv:24.0) Gecko/20100101 Firefox/24.0
 Accept     text/html,application/xhtml+xml,application/xml;q=0.9,*/*;q=0.8
 Accept-Language     en-US,en;q=0.5
 Accept-Encoding     gzip, deflate
 Cookie     __utma=111872281.1348865079.1409020839.1411395889.1419258109.7; __utmz=111872281.1409020839.1.1.utmcsr=(direct)|utmccn=(direct)|utmcmd=(none); s_fid=72CCAD206D09146C-233B60F47DBEA290
 Connection     keep-alive
 Authorization     Basic dXNlcjE6cGFzc3dvcmQx
And, then we get the successful return code of 200 in a response:
 (Status-Line)     HTTP/1.1 200 OK
 Connection     keep-alive
 X-Powered-By     Undertow/1
 Server     WildFly/8
 Content-Length     755
 Content-Type     application/json
 Date     Wed, 03 Jun 2015 13:43:34 GMT
In Conclusion
Just because a service is managed doesn’t automatically make it secure. JBoss apiman provides you with multiple options to add an authentication requirement when clients access your managed service.
Author’s Acknowledgements
As always, the author would like to acknowledge Eric Wittmann and the apiman team for their review comments and suggestions on writing this post, and for adding new features to apiman!
Links
apiman
Previous articles in this series:
HTTP Authentication: Basic and Digest Access Authentication
Monday, May 25, 2015
Tuesday, May 19, 2015
Just reposted to the new apiman blog!
That most recent post is now my first post to the apiman blog:
http://www.apiman.io/blog/rest/api/automation/2015/05/19/rest-api.html
http://www.apiman.io/blog/rest/api/automation/2015/05/19/rest-api.html
Monday, May 18, 2015
JBoss' apiman's API Manager REST services API
In this, the third article in our series on apiman, JBoss' new open source API Management framework, we'll examine apiman’s API Manager REST services API. apiman’s Management UI utilizes this API in the implementation for all of its user-visible features, and you can also use the same API to automate tasks with apiman.
Introduction
It's inevitable that, after you work with a product's UI for a while that you encounter tasks that are better suited to a scripting or batch interface. For example, if you have to perform a similar task for a large of related data items, the time that it can require to perform these tasks through an interactive UI can be prohibitive. Also, it's easy for repetitive tasks to become error prone as you can lose focus, even if you are working in a well designed and easy to use interface such as apiman.
One solution to this problem is to augment the UI with a command line or scripting interface. This can lead to a whole separate set of issues if the new interface is built on a different set of underlying routines than the UI. A better approach to allow access to the same routines in which the UI is constructed. This approach removes any duplication, and also enables you to replicate manual UI based tasks with automated or scripted tools.
JBoss apiman follows this second approach with its REST interface. All the services provided by apiman in its Management UI are directly supported in the API Manager REST services API. You can also directly access these same services through the REST API.
Prerequisites
Like a lot of things with JBoss open source software, installing the REST API is easy. In fact, if you have apiman installed, then you already have the REST API installed. (You can’t get much easier than that!)
We covered installing apiman in the first article in this series (see: http://java.dzone.com/articles/impatient-new-users), so we won't repeat that information here. A minimal set of install instructions are always available on the apiman site (http://www.apiman.io/latest/). The current set of instructions as of this writing are:
 mkdir ~/apiman-1.1.2.Final
 cd ~/apiman-1.1.2.Final
 wget http://download.jboss.org/wildfly/8.2.0.Final/wildfly-8.2.0.Final.zip
 wget http://downloads.jboss.org/overlord/apiman/1.1.2.Final/apiman-distro-wildfly8-1.1.2.Final-overlay.zip
 unzip wildfly-8.2.0.Final.zip
 unzip -o apiman-distro-wildfly8-1.1.2.Final-overlay.zip -d wildfly-8.2.0.Final
 cd wildfly-8.2.0.Final
 ./bin/standalone.sh -c standalone-apiman.xml
Now that our apiman server is up and running, we can start to access the API Manager REST services API. However, before we start placing calls to services through the REST API, let’s take a look at how the API is organized.
The Organization of the API
The documentation for the apiman REST API is available (for free, of course), here: http://www.apiman.io/latest/api-manager-restdocs.html
The services and their endpoints represented in the API are divided into these groups:
- actions - The actions endpoint (http://localhost:8080/apiman/actions/) enables you to execute actions for apiman entities (such as plans, services, applications, etc.)
- system/status - The system/status endpoint (http://localhost:8080/apiman/system/status) enables you to query the current state of the apiman system.
- currentuser - The currentuser endpoint (http://localhost:8080/apiman/currentuser/info) enables you to obtain or update information about the current user. This information is related to the user’s applications, services, organizations, etc.
- gateways - The gateways endpoint (http://localhost:8080/apiman/gateways/) enables you to obtain information about an API Gateway, and to delete or create new gateways.
- organizations - The organizations endpoint (http://localhost:8080/apiman/organizations/) enables you to obtain information about existing organizations and to create new organizations.
- permissions - The permissions endpoint (http://localhost:8080/apiman/permissions/) enables you to obtain information about user’s permissions.
- plugins - The plugins endpoint (http://localhost:8080/apiman/plugins/) enables you to obtain information about installed plugins, and to install new plugins.
- policyDefs - The policyDefs endpoint (http://localhost:8080/apiman/policyDefs/) enables you to obtain information about existing policy definitions, and to define new policy definitions.
- roles - The roles endpoint (http://localhost:8080/apiman/roles/) enables you to obtain information about existing roles, update roles, and delete roles.
- search - The search endpoint (http://localhost:8080/apiman/search/) enables you to search for applications, organizations, or services.
- users - The users endpoint (http://localhost:8080/apiman/users/) enables you to search for information about users, including their applications and services.
Within each group, GET operations are defined to return information, and GET and POST operations are defined to make changes to apiman elements. Data passed to and returned from services through the API is in the form of JSON along with a return code.
Accessing Services in the API Manager REST services API
The best way to learn about the API Manager REST services API is to see it in action. Since these are REST services, it’s easy to access them. For example, we should be able to access the system status service with a simple GET operation at this endpoint:
Let’s try this with curl. If we execute the following command, we should see the current system status:
curl -X GET http://localhost:8080/apiman/system/status
Well, that error is not exactly what we expected. There was no output.
What went wrong? What’s missing? The answer is that our call to the service was missing authorization. In the same way that a user must login and be authorized to use the apiman Management UI, calls to the REST API must be authorized.
For our example, we’ll keep things simple and stick to using basic authorization. (We’ll take a more extensive look at apiman and security in a later article in this series.)
In order to resolve this failure, we have to send a properly encoded basic authorization header with every request you make. In Java8, we can generate a key by base64 encoding this string for the OOTB admin username and password: admin:admin123! with this statememt:
base64encode(concat('admin', ':', 'admin123!'))
This yields a key with a value of: YWRtaW46YWRtaW4xMjMh
Now, let’s try that curl command again, but this time, we’ll include the key in the authorization header:
$ curl -H "Authorization: Basic YWRtaW46YWRtaW4xMjMh"
And the result is:
{"up":true,"version":"1.1.2-SNAPSHOT"}
As we mentioned earlier in this article, the responses returned by calls to the REST API are in in the form of JSON. In the case of our call to the http://localhost:8080/apiman/system/status endpoint, the expected format of the response is:
{
version:string
up:boolean
}
Let’s carry on by looking at a more extensive example, where we use the REST API to automate a task that would be tedious if performed in the apiman Management UI.
A Larger Example
Let’s say that you want to create multiple new organizations. You could of course manually enter these into the apiman Management UI. But, if you have a large number of organizations, for example, one for each of the countries in the EU, or each of the states in the USA, this would be a tedious and error prone task. This is an ideal candidate task for automation with the REST API.
The coding for this example is simple. All you have to do is account for the encoding of the authorization to access the API Manager REST services API, and pass the information related to each organization that you create to this endpoint: http://localhost:8080/apiman/organizations
Here’s an example program with an ice hockey flavor - the highlights are noted below:
1:  package apimanExample;
2:  import java.io.IOException;
3:  import java.io.OutputStreamWriter;
4:  import java.net.HttpURLConnection;
5:  import java.net.URL;
6:  import java.nio.charset.StandardCharsets;
7:  import java.util.Base64;

8:  public class SimplePutOrg {

9:    public static void main(String[] args) throws Exception {

10:     String [] [] originalSix = {
11:         { "Boston", "Chicago", "Detroit", "Montreal", "New York", "Toronto"},
12:         { "Bruins", "BlackHawks", "Red Wings", "Canadiens", "Rangers", "Maple Leafs"}
13:     };
14:     for (int i = 0; i < 6; i++) {
15:       System.out.println ("Creating new apiman org for: " + originalSix [0][i] + ":" + originalSix [1][i]);
16:       System.out.println ("Return code = " + createNewOrg (originalSix [0][i], originalSix [1][i]));
17:     }
18:    }

19:    private static int createNewOrg (String newOrgName, String newOrgDescription) throws IOException {
20:      URL url = new URL("http://localhost:8080/apiman/organizations");
21:      HttpURLConnection connection = (HttpURLConnection) url.openConnection();

22:      Base64.Encoder encoder = Base64.getEncoder();
23:      String normalString = "admin:admin123!";
24:      String encodedString = encoder.encodeToString(normalString.getBytes(StandardCharsets.UTF_8));

25:      connection.setRequestProperty("Authorization", "Basic "  + encodedString);
26:      connection.setRequestMethod("POST");
27:      connection.setDoOutput(true);
28:      connection.setRequestProperty("Content-Type", "application/json");
29:      connection.setRequestProperty("Accept", "application/json");

30:      OutputStreamWriter osw = new OutputStreamWriter(connection.getOutputStream());
31:      osw.write(String.format("{\"name\":\"" + newOrgName + " a new org\",\"description\":\"" + newOrgDescription + "\"}"));
32:      osw.flush();
33:      osw.close();

34:      return connection.getResponseCode();
35:    }
36:  }
Code highlights:
- Lines 10-13: Here's where we define the test data. For this example, we'll use the National Hockey League's "original 6" teams.
- Line 20: Here's the URL for the service to which we'll connect to create the new organizations.
- Lines 22-24 - Here's where we set up the encoding for the BASIC authorization.
- Lines 25-29 - And here's where we create the HttpURLConnection that we will use to connect to the service.
- Line 26: Note that we will be performing a POST operation.
- Lines 30-33 - And finally, here's where we connect to the service and send our POST requests to create the new organizations.
When we run this example, the following output indicates that the calls to the service through the REST API were successful, based on the return code of 200:
 Creating new apiman org for: Boston:Bruins
 Return code = 200
 Creating new apiman org for: Chicago:BlackHawks
 Return code = 200
 Creating new apiman org for: Detroit:Red Wings
 Return code = 200
 Creating new apiman org for: Montreal:Canadiens
 Return code = 200
 Creating new apiman org for: New York:Rangers
 Return code = 200
 Creating new apiman org for: Toronto:Maple Leafs
 Return code = 200
And - here’s the server output that tracks the creation of the new organizations:
 21:17:53,205 INFO [stdout] (default task-19) Created organization Boston a new org: OrganizationBean [id=Bostonaneworg, name=Boston a new org, description=Bruins, createdBy=admin, createdOn=Sun May 17 21:17:53 GMT-05:00 2015, modifiedBy=admin, modifiedOn=Sun May 17 21:17:53 GMT-05:00 2015]
 21:17:53,233 INFO [stdout] (default task-21) Created organization Chicago a new org: OrganizationBean [id=Chicagoaneworg, name=Chicago a new org, description=BlackHawks, createdBy=admin, createdOn=Sun May 17 21:17:53 GMT-05:00 2015, modifiedBy=admin, modifiedOn=Sun May 17 21:17:53 GMT-05:00 2015]
 21:17:53,253 INFO [stdout] (default task-23) Created organization Detroit a new org: OrganizationBean [id=Detroitaneworg, name=Detroit a new org, description=Red Wings, createdBy=admin, createdOn=Sun May 17 21:17:53 GMT-05:00 2015, modifiedBy=admin, modifiedOn=Sun May 17 21:17:53 GMT-05:00 2015]
 21:17:53,275 INFO [stdout] (default task-25) Created organization Montreal a new org: OrganizationBean [id=Montrealaneworg, name=Montreal a new org, description=Canadiens, createdBy=admin, createdOn=Sun May 17 21:17:53 GMT-05:00 2015, modifiedBy=admin, modifiedOn=Sun May 17 21:17:53 GMT-05:00 2015]
 21:17:53,295 INFO [stdout] (default task-27) Created organization New York a new org: OrganizationBean [id=NewYorkaneworg, name=New York a new org, description=Rangers, createdBy=admin, createdOn=Sun May 17 21:17:53 GMT-05:00 2015, modifiedBy=admin, modifiedOn=Sun May 17 21:17:53 GMT-05:00 2015]
 21:17:53,316 INFO [stdout] (default task-29) Created organization Toronto a new org: OrganizationBean [id=Torontoaneworg, name=Toronto a new org, description=Maple Leafs, createdBy=admin, createdOn=Sun May 17 21:17:53 GMT-05:00 2015, modifiedBy=admin, modifiedOn=Sun May 17 21:17:53 GMT-05:00 2015]
And finally, here are the organizations as displayed in the apiman Management UI:
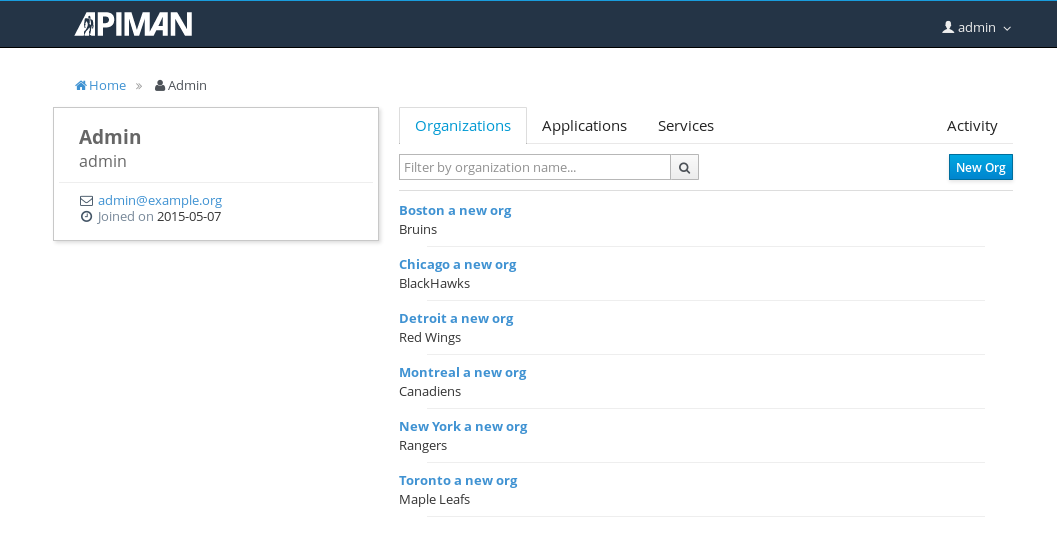
(It’s been a tough year for Boston Bruins’ fans. It’s nice to see the team listed first, even if it’s just an alphabetic list. ;-)
In Conclusion
The architecture of the apiman Management UI is that the UI is built on top of a REST API. This architecture makes it possible for you to directly access the services exposed by the API, and enables you to automate the tasks that you perform in the UI.
Author Acknowledgements
As always, the author thanks the members of the apiman team (especially Eric Wittman) for their input and for their efforts in creating apiman!
Subscribe to:
Posts (Atom)