Monday, December 23, 2013

Hunting for an SWT Test Framework? Say Hello to Red Deer


This is the first in a series of posts on the new “Red Deer” (https://github.com/jboss-reddeer/reddeer) open source testing framework for Eclipse. In this post, we’ll be introduced to Red Deer, and take a look at the some of the advantages that it offers by building a sample test program from scratch. 

Some of the features that Red Deer automated offers are:


  • An easy to use, high-level API for testing standard Eclipse components
  • Support for creating custom extensions for your own applications
  • A requirements validation mechanism to assist you in configuring complex tests
  • Eclipse Tooling to Assist in Creating new Projects
  • A record and playback tool to enable you to quickly create automated tests
  • An integration with Selenium for testing web based applications
  • Support for running tests in a Jenkins CI environment

Note that as of this writing, Red Deer is in an incubation stage. The current release is at level 0.5. The target date for the 1.0 release of Red Deer is late 2014. But, as a community-based, open source project, now is a great time to try Red Deer and make suggestions or even contribute code!


A look at Red Deer’s Architecture


The Red Deer project itself is comprised of utilities and the API that supports the development and execution of automated tests.


The API (the parts of the above diagram that are enclosed in dashed line boxes) can be thought of as having three layers:


  • The top layer consists of extensions to Red Deer’s abstract classes or implementations for Eclipse components such as Views, Editors, Wizards, or Shells. For example, if you are writing tests for a feature that uses a custom Eclipse View, you can extend Red Deer’s View class by adding support for the specific functions of the feature. The advantage that this API layer gives you is that your test programs do not have to focus on manipulating the individual UI elements directly to perform operations. Your programs can instead instantiate an instance of an Eclipse component such as a View, and then use that instance’s methods to perform operations on the View. This layer of abstraction makes your test programs easier to write, understand, and maintain.


  • The middle layer consists of the Red Deer implementations for SWT UI elements such as: Button, Combo, Label, Menu, Shell, TabItem, Table, ToolBar, Tree. This API layer supports the API’s higher level by providing the building blocks for the API’s Views, Editors, Shells, and WIzards. This middle layer of the API also provides Red Deer packages that enable your tests to enforce requirements, so that necessary setup tasks are performed before a test is run.


  • The bottom layer consists of Red Deer packages that support the execution of tests such as: Conditions, Matchers, Widgets, Workbench, and Red Deer extensions to JUnit.


What Makes Red Deer different from other Tools? A Layer of Abstraction


The top-most layer of the API enables you to instantiate Eclipse UI elements as objects, and then manipulate them through their methods. The resulting code is easier to read and maintain, instead of being brittle and subject to failures when the UI changes.


For example, for a test that has to open a view and press a button, without Red Deer, the test would have to navigate the top level menu, find the view menu, then the view type in that menu, then find the view open dialog, then locate the “OK” button, etc. Your test would have to spend a lot of time navigating through the UI elements before it could even begin to perform the test’s steps.

With Red Deer, the code to open a view (in this case, the servers view) is simply:

 ServersView view = new ServersView();   
 view.open();  


Furthermore, within that ServersView, your test program can perform operations on the View through methods which are defined in the view (and are incidentally also well debugged by the Red Deer team), instead of having to explicitly locate and manipulate the UI elements directly. For example, to obtain a list of all the servers, instead of locating the UI tree that contains the server list, and extracting that list of servers into an array, your Red Deer program can simply call the “getServers()” method.

Likewise, the code to open a PackageExplorer, and then select a project within that PackageExplorer is as follows:

 PackageExplorer packageExplorer = new PackageExplorer();packageExplorer.open()  
 packageExplorer.getProject("myTestProject").select();  

And, the code to retrieve all the projects within that PackageExplorer is simply:

 packageExplorer.getProjects();  

The result are that your tests are easier to write and maintain and you can focus on testing your application’s logic instead of writing brittle code to navigate through the application.

Installing Red Deer

The only prerequisites to using Red Deer are Eclipse and Java. In this post, we’ll use Eclipse Kepler and OpenJDK 1.7, running on Red Hat Enterprise Linux (RHEL) 6.

To install Red Deer 0.4 (this is the latest stable milestone version as of this writing) follow these steps:

Now that you have Red Deer installed, let’s move onto building a new Red Deer test.

Building your First Red Deer Test

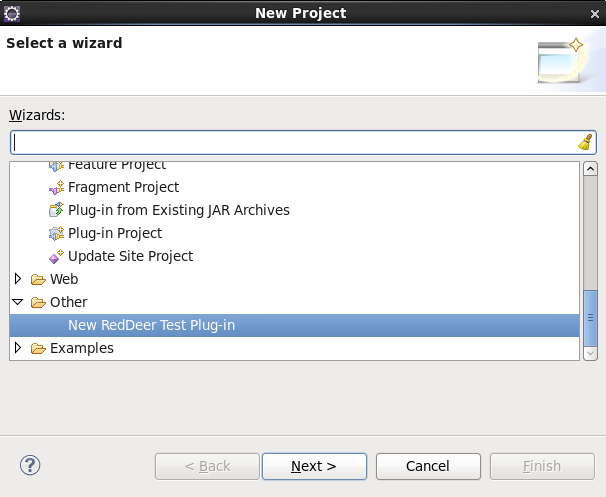
To create the new Red Deer test project, you make use of the Red Deer UI tooling and select New->Project->Other->Red Deer Test:


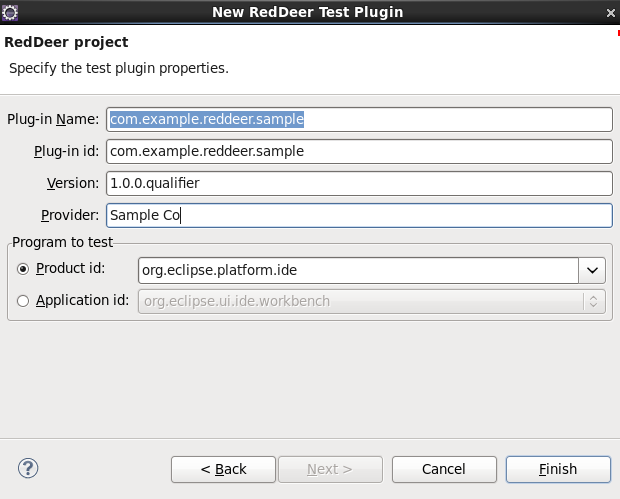
Before we move on, let’s take a look at the WEB-INF/MANIFEST.MF file that is created in the project:

 Manifest-Version: 1.0  
 Bundle-ManifestVersion: 2  
 Bundle-Name: com.example.reddeer.sample  
 Bundle-SymbolicName: com.example.reddeer.sample;singleton:=true  
 Bundle-Version: 1.0.0.qualifier  
 Bundle-ActivationPolicy: lazy  
 Bundle-Vendor: Sample Co  
 Bundle-RequiredExecutionEnvironment: JavaSE-1.6  
 Require-Bundle: org.junit, org.jboss.reddeer.junit, org.jboss.reddeer.swt, org.jboss.reddeer.eclipse  


The line we’re interested in is the (highlighted) final line in the file. These are the bundles that are required by Red Deer.

After the empty project is created by the wizard, you can define a package and create a test class.  Here's the code for a minimal functional test. The test will verify that the eclipse configuration is not empty.

1:  package com.example.reddeer.sample;  
2:    
3:  import static org.junit.Assert.assertFalse;  
4:  import java.util.List;  
5:  import org.jboss.reddeer.swt.api.TreeItem;  
6:  import org.jboss.reddeer.swt.impl.button.PushButton;  
7:  import org.jboss.reddeer.swt.impl.menu.ShellMenu;  
8:  import org.jboss.reddeer.swt.impl.tree.DefaultTree;  
9:  import org.junit.Test;  
10:  import org.junit.runner.RunWith;  
11:  import org.jboss.reddeer.junit.runner.RedDeerSuite;  
12:    
13:  @RunWith(RedDeerSuite.class)  
14:  public class SimpleTest {  
15:    
16:    @Test  
17:    public void TestIt() {  
18:    
19:      new ShellMenu("Help", "About Eclipse Platform").select();  
20:      new PushButton("Installation Details").click();  
21:            
22:      DefaultTree ConfigTree = new DefaultTree();  
23:      List<TreeItem> ConfigItems = ConfigTree.getAllItems();  
24:            
25:      assertFalse ("The list is empty!", ConfigItems.isEmpty());  
26:      for (TreeItem item : ConfigItems) {  
27:        System.out.println ("Found: " + item.getText());  
28:      }  
29:    }  
30:  }  

After you save the test's source file, you can run the test.  To run the test, select the Run As->Red Deer Test option:


And - there's the green bar!


Simplifying Tests with Requirements

Red Deer requirements enable you to define actions that you want happen before a test is executed. The advantage to using requirements is that you define the actions with annotations instead of using a @BeforeClass method. The result is that your test code is easier to read and maintain. The biggest difference between a Red Deer requirement and the the @BeforeClass annotation from the JUnit framework is that if a requirement cannot be fulfilled the test is not executed.

Like everything else in Red Deer, you can make use of predefined requirements, or you can extend the feature by adding your own custom requirements. These custom requirements can be made complex and for convenience can be stored in external properties files. (We’ll take a look at defining custom requirements in a later post in this series when we examine how to create and contribute extensions to Red Deer.)

The current milestone release of Red Deer provides predefined requirements that enable you to clean out your current workspace and open a perspective. Let’s add these to our example.

To do this, we need to add these import statements:

 import org.jboss.reddeer.eclipse.ui.perspectives.JavaBrowsingPerspective;  
 import org.jboss.reddeer.requirements.cleanworkspace.CleanWorkspaceRequirement.CleanWorkspace;  
 import org.jboss.reddeer.requirements.openperspective.OpenPerspectiveRequirement.OpenPerspective;  


And these annotations:

 @CleanWorkspace  
 @OpenPerspective(JavaBrowsingPerspective.class)  

And, we also have to  a reference to org.jboss.reddeer.requirements to the required bundle list in our example’s MANIFEST.MF file.

Require-Bundle: org.junit, org.jboss.reddeer.junit, org.jboss.reddeer.swt, org.jboss.reddeer.eclipse, org.jboss.reddeer.requirements   

When we’re done, our example looks like this (the new lines are highlighted):

1:  package com.example.reddeer.sample;  
2:    
3:  import static org.junit.Assert.assertFalse;  
4:  import java.util.List;  
5:  import org.jboss.reddeer.swt.api.TreeItem;  
6:  import org.jboss.reddeer.swt.impl.button.PushButton;  
7:  import org.jboss.reddeer.swt.impl.menu.ShellMenu;  
8:  import org.jboss.reddeer.swt.impl.tree.DefaultTree;  
9:  import org.junit.Test;  
10:  import org.junit.runner.RunWith;  
11:  import org.jboss.reddeer.junit.runner.RedDeerSuite;  
12:  import org.jboss.reddeer.eclipse.ui.perspectives.JavaBrowsingPerspective;  
13:  import org.jboss.reddeer.requirements.cleanworkspace.CleanWorkspaceRequirement.CleanWorkspace;  
14:  import org.jboss.reddeer.requirements.openperspective.OpenPerspectiveRequirement.OpenPerspective;  
15:    
16:  @RunWith(RedDeerSuite.class)  
17:  @CleanWorkspace  
18:  @OpenPerspective(JavaBrowsingPerspective.class)  
19:  public class SimpleTest {  
20:    
21:    @Test  
22:    public void TestIt() {  
23:    
24:          new ShellMenu("Help", "About Eclipse Platform").select();  
25:          new PushButton("Installation Details").click();  
26:            
27:          DefaultTree ConfigTree = new DefaultTree();  
28:          List ConfigItems = ConfigTree.getAllItems();  
29:            
30:          assertFalse ("The list is empty!", ConfigItems.isEmpty());  
31:          for (TreeItem item : ConfigItems) {  
32:               System.out.println ("Found: " + item.getText());  
33:          }  
34:    }  
35:  }  

Notice how we were able to add those functions to the test code, while only adding a very small amount of actual new code? Yes, it can pay to be a lazy programmer. ;-)    

What’s Next?

What’s next for Red Deer is its continued development as it progresses through its incubation stage until its 1.0 release. What’s next for this series of posts will be discussions about:

  • The Red Deer Recorder - To enable you to capture manual actions and convert them into test programs
  • How you can Extend Red Deer - To provide test coverage for your plugins’ specific functions.
  • And How you can Contribute these extensions to the Red Deer project.
  • How you can Define Complex Requirements - To enable you to perform setup tasks for your tests.
  • Red Deer’s Integration with Selenium - To enable you to test web interfaces provided by your plugins.
  • Running Red Deer tests with Jenkins - To enable you to take advantage of Jenkins’ Continuous Integration (CI) test framework.

Author’s Acknowledgements

I’d like to thank all the contributors to Red Deer for their vision and contributions. It’s a new project, but it is growing fast! The contributors (in alphabetic order) are: Stefan Bunciak, Radim Hopp, Jaroslav Jankovic, Lucia Jelinkova, Marian Labuda, Martin Malina, Jan Niederman, Vlado Pakan, Jiri Peterka, Andrej Podhradsky, Milos Prchlik, Radoslav Rabara, Petr Suchy, and Rastislav Wagner.


Monday, September 2, 2013

Don't Forget the DBU Test!


The test plan review had gone pretty well. There were a few yawns, some disagreements, but mostly there were heads nodding in agreement. We had defined a large, detailed set of tests to verify individual functions, system end-to-end performance, and non-functional aspects such as security, scalability, and usability. The review was just ending when someone mentioned: 

"Don't forget the DBU test."

My mind did a quick search of its RAM. "DBU test?" What could this be? Distributed Buffer Unit? Detached Binary Union? Dastardly Bad Unicode? Didn't Break Unix? Nothing made sense. What the heck is a DBU I thought to myself? Finally, I had to ask for an explanation of the what the term "DBU" meant.

The answer was simple:  "It's the Don't Blow Up test. You know, the first test you run to prove that the software under test is actually solid enough to be fully tested. Just try a few things and make sure that it doesn't blow up."

At that point, it dawned on me that we actually had a hole in our test planning. We had defined the CLASSES of tests that we wanted to execute, but we had failed to define the SEQUENCE in which we would run the tests. The DBU test was really another name for a smoke test or an acceptance test. The idea behind this is simple, before attempting a full cycle, where you may have to setup/install/configure a large number of systems, you first perform a small test to verify that the software under test is stable enough to support extensive testing. 

It's a good approach to follow, especially early in a product test cycle when new features are not yet stable, and when your test activities are moving from planning to execution. It may seem like an overly casual approach, but as is the case with exploratory testing, it does require forethought and organization. You don't want to randomly "try a bunch of things." You want to define a set of quick tests that will exercise a majority of the major features of the software under test. If the software can pass this initial wide, but shallow test, then it is at least stable enough to support deeper testing. 

So, a good first question to ask is, did it blow up? If the answer is 'no,' then you can move on. In other words, always start with the DBU test. 

Admiral Blandy Mushroom Cloud Cake

Special thanks to Burr for inspiring the DBU!


Thursday, August 8, 2013

Back from Brno

We just returned from my favorite city in southern Moravia - Brno. It's a great city!

It has castles and cathedrals:   

A great old town section:    

A quite awesome ruin of an abbey: 


World famous architecture:


And, of course, great people, cool technology........and wonderful food:


Now, if I could only learn a little more Czech than "good evening."   DobrĂ˝ den!


Wednesday, April 10, 2013

Eclipse Remote Debugging an SWTBot Test

Debugging a failing automated GUI test can be difficult. It's generally not an efficient debugging technique to sit staring at your computer there watching the test manipulate the UI until it crashes. (Although, it can be fun to see the reactions of co-workers as you sit with your arms folded while your computer seems to be working on its own.  ;-)

I had a problem recently in debugging a test for an eclipse plugin, but, luckily a couple of co-workers were able to point me toward a solution. 

The tests in question were written using SWTBot (http://www.eclipse.org/swtbot/). SWTBot is a great open source testing framework that provides a layer of abstraction through its API to facilitate automated SWT and eclipse plugin test development. SWTBot's API makes it easy to write automated tests that exercise the UI and provide pass/fail information through its implementation of assertions.  

My test was failing, but it was not immediately obvious if the problem was a bug in the software under test, a bug in (gasp!) the test code, or maybe even a bug in the test framework. After staring at the code for a while, I fell into the trap of running the test over and over, while I watched the UI. After a few attempts it dawned on me that this approach was crazy. I might as well have been watching old movies on TV. 

What I needed to do is use a debugger to stop the test's execution while I examined the UI.
The problem was that while I could have used a debugger in Eclipse, I wanted to be able to run the test in the same unattended configuration (running under maven from the CLI) that it would have to use when it was run in our test framework. But, at the same time, I also wanted to be able to manipulate the program and the UI and access its source code through a debugger in eclipse.

The test had to be run unattended with maven -  but, how could I do this and use the debugger? 

The answer was to use remote debugging. Before looking at how this works, let's look at some background on Java debugging in general.

Java Debugging

The place to begin is with the Java Platform Debugger Architecture (JPDA, http://docs.oracle.com/javase/6/docs/technotes/guides/jpda/architecture.html)

The JPDA provides a multi-layer debugging architecture. There are (3) elements involved:
  • The debugger
  • The process being debugged (the "debuggee")
  • The channel over which the debugger and debuggee communicate 
Each element makes use of one of the Java APIs provided by the JPDA:
  • The debugger uses the Java Debug Interface (JDI). The JDI defines a high level interface that can be used to program a debugger.
  • The debuggee uses the Java VM Tool Interface (JVM TI). The JVM TI  defines the debugging services, such as inspecting the state of a running application, that  a JVM provides.
  • The communications channel makes use of the Java Debug Wire Protocol (JDWP). The JDWP defines the communications protocol (requests, messages, etc.) between the debugger and debuggee.
I referred to "remote" debugging a minute ago. This is the case even though the test being debugged was completely running on a local system. What happens is that to debug the test, an eclipse Remote Java Application Debug configuration is defined and configured to listen to the JVM over a specified port.

The JDWP communications channel is the vehicle that get used to connect the debuggee (which in this case is the test running under maven) to the debugger (which in this case is the Eclipse debugger).

Creating and remote debugging an SWTBot project turns out to be a simple 4-step process:

Step 1 - Creating a New SWTBot Plugin Project, Converting it to a Maven Project

Creating a new SWTBot plugin project in Eclipse is as easy as, well, installing SWTBot into Eclipse and then creating a new project.

Let's start by creating a new SWTBot project. Now, since we want to debug a SWTBot test, we'll include buggy test class in the project. Here's the code for our buggy little test:

package simple;
import org.eclipse.swtbot.eclipse.finder.SWTWorkbenchBot;
import org.eclipse.swtbot.swt.finder.junit.SWTBotJunit4ClassRunner;
import org.eclipse.swtbot.swt.finder.widgets.SWTBotShell;
import org.junit.Test;
import org.junit.runner.RunWith;
 
@RunWith(SWTBotJunit4ClassRunner.class)
public class BuggyTest {
 
    @Test
    public void canCreateANewJavaProject() throws Exception {

        SWTWorkbenchBot bot;
        bot = new SWTWorkbenchBot();
        bot.viewByTitle("Welcome").close();

        bot.menu("File").menu("New").menu("Project...").click();
 
        SWTBotShell shell = bot.shell("New Project");
        shell.activate();
        bot.tree().expandNode("Java").select("Java Project");
        bot.button("Next >").click();
 
        bot.textWithLabel("Project nname:").setText("TestProject");   
        // oops - it should be "name" not "nname"
        bot.button("Finish").click();
    }
}

Since we want to be able to run the project with Maven outside of Eclipse, the project then has to be converted to a Maven project. This conversion is also simple from within Eclipse. Just right-click on the project name, then select Configure->Convert to Maven Project

Before we move on, we have to configure our Maven project to download both SWTBot and to configure an Eclipse Test Platform to be used to run the test. Luckily, this is easy to handle in the project's pom.xml file:

 <project xmlns="http://maven.apache.org/POM/4.0.0" xmlns:xsi="http://www.w3.org/2001/XMLSchema-instance" xsi:schemaLocation="http://maven.apache.org/POM/4.0.0 http://maven.apache.org/xsd/maven-4.0.0.xsd">
  <modelVersion>4.0.0</modelVersion>
  <groupId>simpleSWTBot</groupId>
  <artifactId>simpleSWTBot</artifactId>
  <version>0.0.1-SNAPSHOT</version>
  <packaging>eclipse-test-plugin</packaging>

  <properties>
    <tycho-version>0.11.0-SNAPSHOT</tycho-version>
  </properties>

  <repositories>
   <repository>
     <id>juno</id>
     <layout>p2</layout>
     <url>http://download.eclipse.org/releases/juno</url>
   </repository>
   <repository>
     <id>swtbot</id>
     <layout>p2</layout>
     <url>http://download.eclipse.org/technology/swtbot/releases/2.1.0/</url>
   </repository>
  </repositories>
  
    <pluginRepositories>
    <pluginRepository>
        <id>sonatype</id>
        <url>https://repository.sonatype.org/content/repositories/snapshots/</url>
        <snapshots>
           <enabled>true</enabled>
        </snapshots>
     </pluginRepository>
  </pluginRepositories>

  <build>
    <plugins>
      <plugin>
        <groupId>org.sonatype.tycho</groupId>
        <artifactId>tycho-maven-plugin</artifactId>
        <version>${tycho-version}</version>
        <extensions>true</extensions>
      </plugin>
      <plugin>
        <groupId>org.sonatype.tycho</groupId>
        <artifactId>target-platform-configuration</artifactId>
        <version>${tycho-version}</version>
        <configuration>
          <resolver>p2</resolver>
        </configuration>
      </plugin>
      <plugin>
        <groupId>org.sonatype.tycho</groupId>
        <artifactId>maven-osgi-test-plugin</artifactId>
        <version>${tycho-version}</version>
        <configuration>
          <useUIHarness>true</useUIHarness>
          <useUIThread>false</useUIThread>
          <product>org.eclipse.sdk.ide</product>
          <application>org.eclipse.ui.ide.workbench</application>
          <dependencies>
            <dependency>
              <type>p2-installable-unit</type>
              <artifactId>org.eclipse.sdk.ide</artifactId>
              <version>0.0.0</version>
            </dependency>
           </dependencies>
        </configuration>
      </plugin>
    </plugins>  
  </build>
</project>


It's worthwhile to review a couple of elements in the pom.xml file as the file, while small, enables Maven to do quite a bit:
  • The first repository definition enables Maven to download the version of Eclipse (Juno) artifacts that we'll use in the test, and the second repository enables Maven to download the SWTBot artifact that will be used. The Eclipse p2 provisioning system (http://www.eclipse.org/equinox/p2/) performs the downloads and installations.
  • The Tycho plugins (http://www.sonatype.org/tycho) perform the actual building of the eclipse plugins that constitute the test and the extensions to Eclipse for SWTBot.
The other project file that we have to edit is the MANIFEST.MF file. All we have to do here is to ensure bundle version matches that defined in the pom.xml file:

Manifest-Version: 1.0
Bundle-ManifestVersion: 2
Bundle-Name: simpleSWTBot
Bundle-SymbolicName: simpleSWTBot;singleton:=true
Bundle-Version: 0.0.1.qualifier
Bundle-ActivationPolicy: lazy
Bundle-Vendor:
Bundle-RequiredExecutionEnvironment: J2SE-1.5
Require-Bundle: org.eclipse.swtbot.go

Now that our project is built and configured, the next step is to execute it with Maven outside of Eclipse.

Step 2 - Running the Test with Maven

Before we try to debug the error that we've built into the test, let's run the test so that our maven repo is fully populated with the necessary Eclipse and SWTBot artifacts. We'll do this first as the first time we run the test Maven's downloading these artifacts this may take several minutes.

Configuring maven to avoid using mirror sites can make this run faster:  -Dtycho.disableP2Mirrors=true

The command to install and run the test is:  mvn clean install

When we run this program, we (eventually - after all the downloads are done) get this predictable error:

Could not find widget matching: (of type 'Text' and with label (with mnemonic 'Project nname:'))


Note that you may also see problems using Java 1.7 - these may be caused by the compression utility that Mavin is using to unpack jar files. If you see errors such as:

[ERROR] Internal error: java.lang.IllegalArgumentException: Comparison method violates its general contract! -> [Help 1]

Then adding this setting to your command can resolve that problem:
-Djava.util.Arrays.useLegacyMergeSort=true

Now, we're all set to run the test with a remote debugger.

The best way to attach a remote debugger is to use the debugPort system property.

(See https://community.jboss.org/wiki/RemoteDebuggingForEclipseTestPlug-inRunningByTycho for details.)

When re-run the test again, we see the following output:

mvn install -DdebugPort=8001
Listening for transport dt_socket at address: 8001

What's happening here is that the debugger is waiting for a remote program to connect to it on port 8001. Make note of the port number (8001) as we'll need to reference that in the Eclipse debug configuration that we'll use to run the test.

Step 3 - Add a Breakpoint to the Test Class

Now, back in Eclipse, let's add a breakpoint to the test class:


We're all set run the remote debugger now.

Step 4 - Creating and Running an Eclipse Debug Configuration

Next, while still in Eclipse, select the test class that we want to execute, select "Debug As," and create a new debug configuration. In the debug configuration, specify that you want to run the test class as a Remote Java Application. Then, fill in the test project, the host is localhost and port 8001 and we're ready to go.


Starting the debugger makes the waiting test execution run and then stop on the first breakpoint. (Eclipse will also ask us if we want to switch to the Debug perspective.)


At this point, the SWTBot thread gets suspended and we can play with Eclipse UI. Lo and behold, there's the bug! We misspelled "name."

Summary

OK, let's recap what we did here. We wanted to debug a failing SWTBot UI test, and have the test run outside of Eclipse with Maven. We converted the SWTBot project into a Maven project, reconfigured the project's pom.xml file so Maven could download the Eclipse and SWTBot resources that it needed to run, ran the test, and connected to it as a remote Java application. And we did all this with only a few mouse clicks in Eclipse!

(Special thanks to Michael Istria and Vlado Pakan for his help in writing this post!)

Information Sources