This is the second in a series of articles exploring API management with JBoss apiman. The first article (http://java.dzone.com/articles/impatient-new-users) was a general introduction to apiman for impatient users where in only 10 minutes we installed apiman, created users and organizations, and services, policies, contracts, and applications. In this article, we'll take the first step toward customizing apiman by creating new plugins to implement service policies.
The major new feature added to release 1.0.2 of apiman (http://www.apiman.io/) is the ability to extend its features through a custom plugin framework. Since policies perform the most important apiman runtime operations, plugins that enable you to create new policies are the first type of plugins to be supported.
In this article, we'll examine all the steps that you must perform to create a new policy plugin, and then import it into apiman and configure a service to put it into use.
Prerequisites
For this article, we’ll assume that you have completed all the steps in the first article in this series. The first article guides even the most impatient user through installing and using apiman.
Accessing the Example Plugins
Like all JBoss software, apiman provides functioning example code that you can use as a starting point for your own plugins. The easiest way to create and package an apiman is as a standard maven project packaged as a .war file.
To download a copy of the example plugins, execute this git command:
git clone https://github.com/apiman/apiman-plugins
When the git clone operation completes, you’ll have the source code for multiple example plugins. The exact set of plugins that you have downloaded may change, depending on when you download them, as more examples are always being added. For the purposes of this article, we’ll focus on the “config-policy” example plugin. This plugin demonstrates how a plugin can be used to set the value of properties in a message being processed by a service. Specifically, this plugin defines properties in the request and response headers and enables you to set their values to “true.”
Requirements for a Plugin Implementation
The easiest way that an apiman policy plugin can be build and packaged is as a standard maven project packaged as a .war file. There are just a few modifications that are required to convert a .war into a plugin.
Let’s take a closer look at the files and directories that comprise the apiman config-policy plugin, and the changes that are needed to implement a plugin:
├---pom.xml
└---src
└---main
├---apiman
│ ├---plugin.json
│ └---policyDefs
│ ├---config-policyDef.json
│ └---schemas
│ └---config-policyDef.schema
└---java
└---io
└---apiman
└---plugins
└---config_policy
├---ConfigBean.java
└---ConfigPolicy.java
The most obvious difference is the addition of the “apiman” directory. This directory is used to contain the configuration files for the plugin. (In other words, the files that make the project a plugin.) The only project-wide configuration change that you have to make is to modify the plugin’s maven pom.xml file to include the apiman directory when the project is built. The following lines are added to the plugin’s pom.xml file:
      <resource>
        <directory>src/main/apiman</directory>
        <targetPath>META-INF/apiman</targetPath>
        <filtering>true</filtering>
       </resource>
The result of these statements in the pom.xml file is that the contents of the apiman directory are included in the project build’s META-INF directory. (We’ll take a look at this later when we build the plugin project.) Setting filtering to true enables maven property expansion during the creation of the plugin war file.
Configuration files for the plugin are contained in the apiman directory. The primary configuration file is the “plugin.json” file. This file is required for all apiman plugins, regardless of the plugin type. The meta-data contained in this file describes the plugin and is displayed in the API Manager UI.
Since our example is contributing a policy, it must contain a JSON file that defines the policy. This JSON file is contained in the apiman/policyDefs directory and is named “config-policyDef.json.” This file defines the following fields for the policy:
- id - A unique identifier for the policy
- name - A user friendly (in other words, a human readable) name for the policy. This policy name is displayed in the API Manager UI
- description - A description of the policy
- policyImpl - This is the fully qualified classname name of the Java class that actually implements the policy. This value must be properly formatted to include information about the plugin, including placeholders for maven properties, for example, project version.
- icon - This is the name of a Font Awesome icon (http://fortawesome.github.io/Font-Awesome/) that is displayed for the Policy in the API Manager UI.
- formType - The type of policy configuration UI form. Our example uses JsonSchema.
- form - This is a relative path to the policy configuration UI form contained in the plugin. Our examples uses the JSON Schema that defines the configuration data format. (More on this file in a minute.
In our example, the config-policyDef.json looks like this:
 {
  "id" : "config-policy",
  "name" : "Config Policy",
  "description" : "A policy used to showcase policy configuration.",
  "policyImpl" : "plugin:${project.groupId}:${project.artifactId}:${project.version}:${project.packaging}/io.apiman.plugins.config_policy.ConfigPolicy",
  "icon" : "sliders",
  "formType" : "JsonSchema",
  "form" : "schemas/config-policyDef.schema"
 }
We mentioned that since our example uses the JSON schema (http://json-schema.org/documentation.html), we have to also define the configuration data format. This is done in the policyDefs/schemas/config-policyDef.schema file. This file defines the format used in the policy configuration file data and is used by the API Manager UI to generate a form that is used to fill in the values to be used to configure the policy. In our example, the policy’s JSON schema defines two properties: requestHeader and responseHeader.
 {
  "title" : "Configure HTTP Headers",
  "description" : "Set the HTTP request header to populate with the value 'true' when the request is made. Also set the HTTP response header to populate with the value 'true' after the response is received from the back-end service.",
  "type" : "object",
  "properties": {
   "requestHeader": {
    "title" : "Request Header",
    "type" : "string",
    "minLength" : 1,
    "maxLength" : 64
   },
   "responseHeader": {
    "title" : "Response Header",
    "type" : "string",
    "minLength" : 1,
    "maxLength" : 64
   }
  }
 }
That finishes the description of the policy’s configuration files. To complete the policy plugin, the example also requires the Java implementation for the policy itself. The policy implementation is contained in the src/main/java/io/apiman/plugins/config_policy/ConfigPolicy.java file. The policy is very simple as it merely appends a header to the http request and response.
Java policy classes must implement the apiman IPolicy interface. This example takes that a step further by actually extending the io.apiman.gateway.engine.policies.AbstractMappedPolicy class. By doing so, the policy Java code can take advantage of the AbstractMappedPolicy’s class use of the Jackson (https://github.com/FasterXML/jackson) JSON parser to parse the policy configuration data into a Java bean. (In this example, the bean is implemented in src/main/java/io/apiman/plugins/config_policy/ConfigBean.java.) If the policy implemented the IPolicy interface, instead of extending AbstractMappedPolicy, then the policy Java class would have to implement its own parser.
Building the Plugin and Installing it into the Maven Repo
Building the plugin with maven is easy. Just execute this command from the directory that contains the plugin’s pom.xml file.
mvn install
In case you’re wondering why, we’re installing the plugin into the maven repo. The answer is simply that in the current release of apiman, the only supported install path is from the maven repo. Future releases of apiman will likely support additional installation paths.
Installing a Plugin into apiman
In apiman, a policy plugin, once installed, is available on a system-wide basis. Accordingly, plugins can only be installed by an admin user. After you login as admin, you’ll see this in the admin UI:

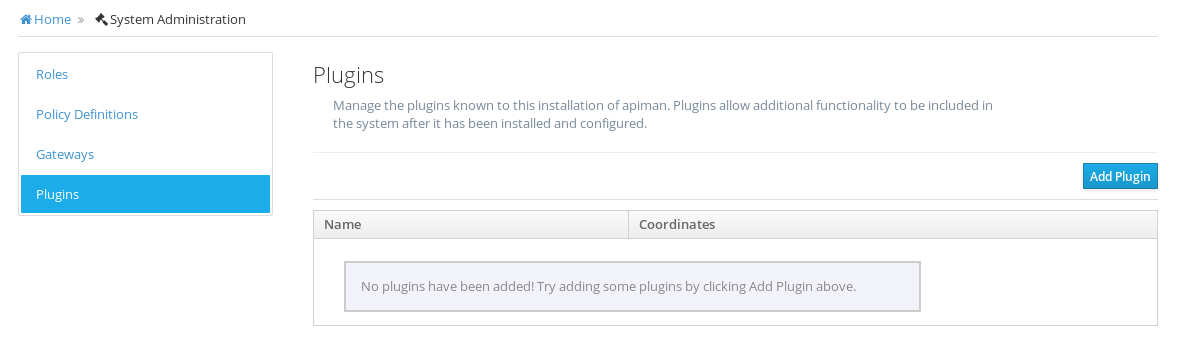
After selecting “Manage Plugins,” you’ll see a screen that looks like this:
And, if you then select “Add Plugin,” you’ll see this screen:
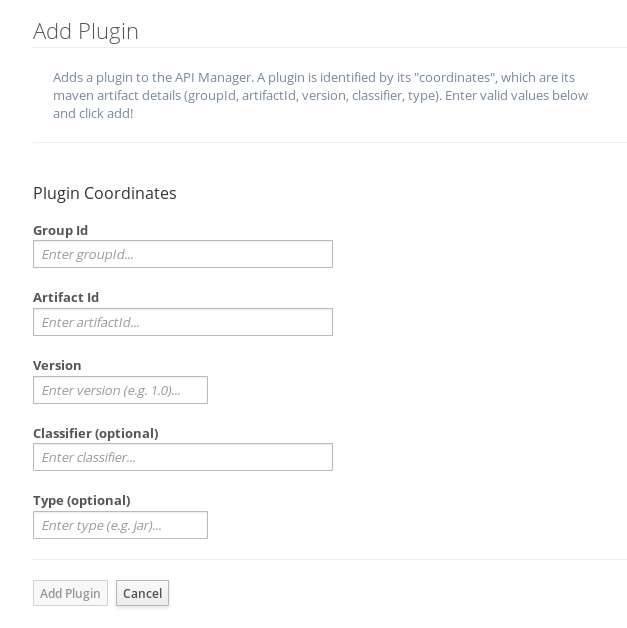
The GroupId, ArtifactId, and Version information is all available in the example plugin’s pom.xml file:
GroupId: io.apiman.plugins
ArtifactId: apiman-plugins-config-policy
Version: 1.0.3-SNAPSHOT
After you enter this information for the plugin and click on “Add Plugin,” you’ll see this displayed in the UI:
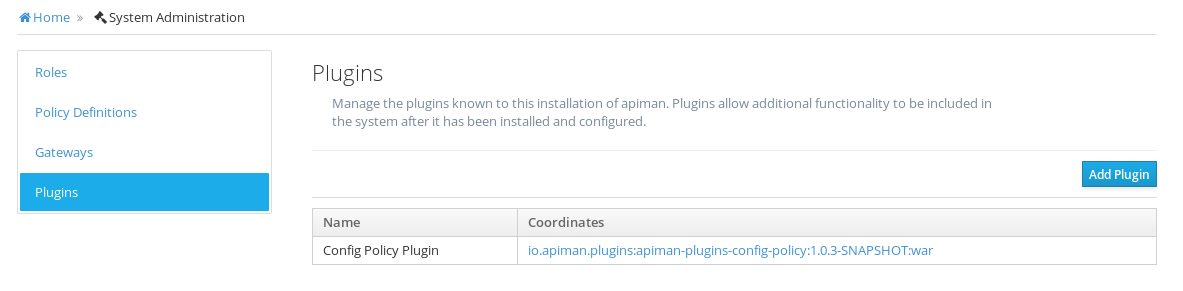
Congratulations! The plugin is installed and is ready to be used! Let’s add it to a service and see it in action.
Using the Installed Plugin
First, we have to log out of the admin account in the Admin UI and then log back in as the “serprov” service provider. Then, select our “echo” service, and create a new version of the service, based on the original version of the service:

And, when you add a new policy to the service, you’ll see the example config service that we just installed:

When you select the Config Policy, you’ll be presented with a dialog where you can specify the values for the two properties defined in the policy:
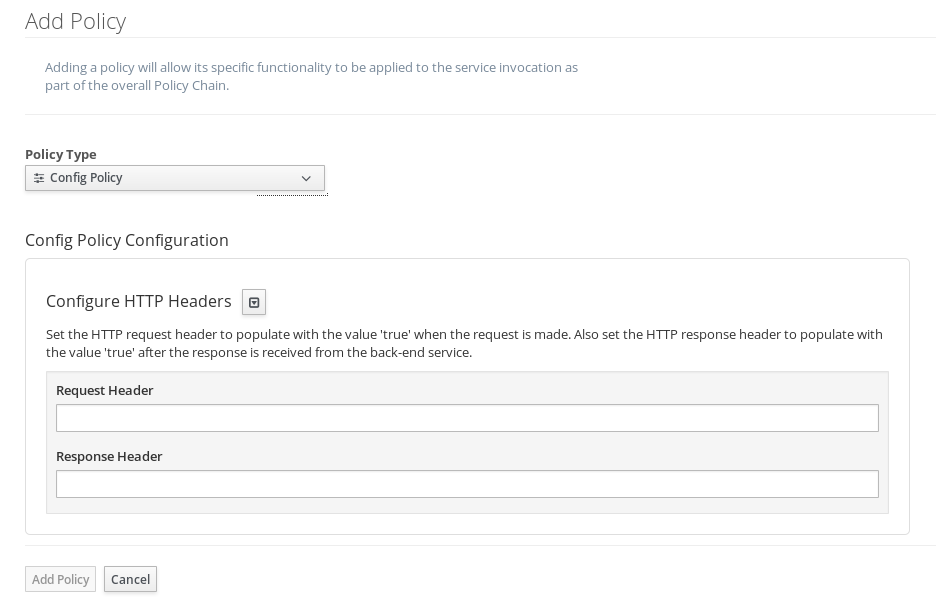
Let’s fill in some easy to remember values:

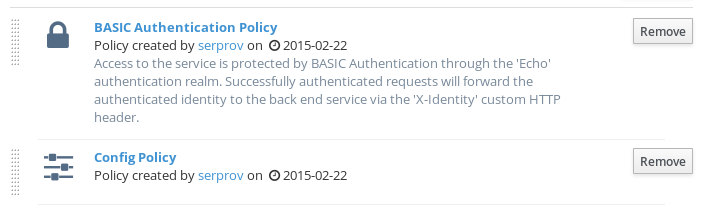
After adding the policy, you’ll see it displayed in the policies defined for the service:
Then publish the service. In order to consume the service, login to the API Manager UI as the application developer “appdev,” and create a new application that uses the new service. (We covered the creation of new applications in detail in the first article in this series - http://java.dzone.com/articles/impatient-new-users)
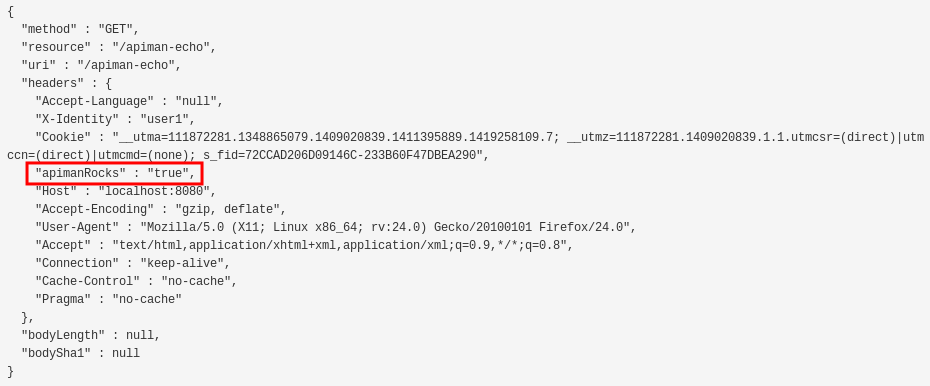
And when the service is invoked, you’ll see something like this:
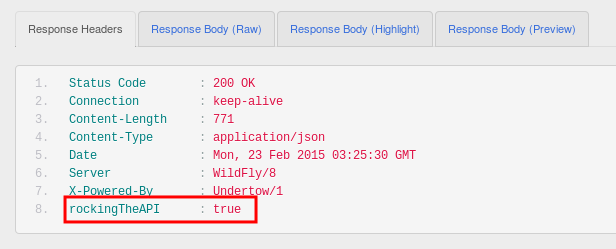
And this:
In Conclusion
OK, let’s recap. apiman is a rapidly growing and developing project. Each new release brings new features. In release 1.0.2, it became possible for users to contribute custom policies into their apiman installation through the API Manager UI.
Acknowledgements
As always, the author would like to acknowledge Eric Wittmann for his (never impatient) review comments and suggestions on writing this post, and for adding new features to apiman!
References
The first article in this series - http://java.dzone.com/articles/impatient-new-users